The iCade to arcade stick mod
/Required Hardware:
- The Original ION iCade
- iPad 2 or later
- GameThing DIY Frame
- Two Wire Leads 2 x 1.5V AA Battery Holder Case (to hold the two AA batterie's)
- Security Torx Screwdriver
Over the years I have had many different MAME systems to run my old school arcade games. The best of which is my MAME arcade cabinet. It's a beauty, but it only runs 500 games. It's also difficult to move from place to place even with wheels on it. In the end I decided that I was not going to build another MAME cabinet.
So, what could I do? And better yet, how could I do it using parts that I had? I decided that I really just wanted to make a system that outputs to my television. I had a jailbroken iPad that could connect to my tv. I also had an iCade controller that would work with the iPad while sitting across the room from the tv. I already had everything I needed! It was just a matter of improving the iCade stick. That's where the Cuddleburrito GameThing came in.
The ION iCade is a well supported arcade stick that works with the iPad. The circuit board in the iCade is very good, well supported, and uses Bluetooth so it is wireless. But the controller, buttons, and the housing leave much to be desired. The buttons make loud clicking noises. The controller sounds the same and has a loose feel to it.
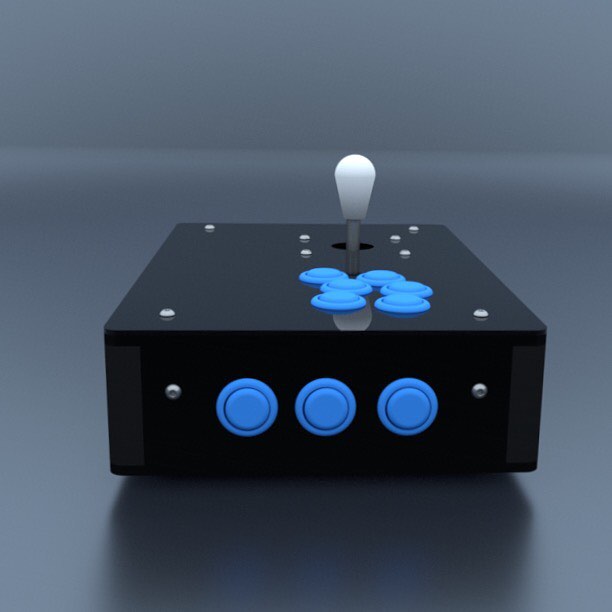
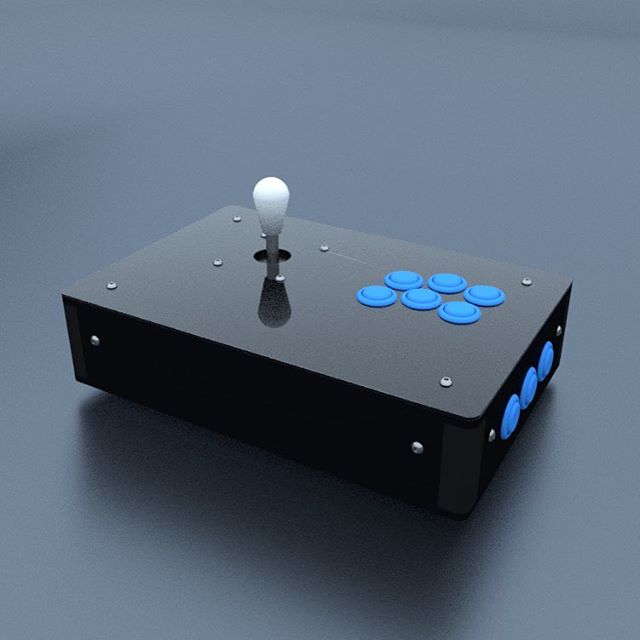
That's why it makes so much sense to take the circuit board out of the iCade and put it into a GameThing arcade stick. With the GameThing frame, you can add many different types of professional arcade sticks and buttons. In mine I use a Sanwa controller and white Seimitsu buttons.


How-to
The first thing to do is to remove the body of the iCade from the controller using the hex allen key that came with the iCade, or one that fits. Make sure you keep the top piece that shows you a diagram of the controller and how to use it. It will come in handy later. The rest of the frame can be discarded.
Next you flip the arcade stick over onto its back and remove all the screws using a Phillips head screwdriver. You may also need a Security Torx screwdriver to remove two of the screws from the bottom of the iCade.
Source: www.myglasseye.net
You will need to remove the wires from the joystick and the button switches. You can use a pair of pliers to remove the button wires together with their connectors. The joystick wires can be cut from the joystick using quick clips. Keep as much of the wiring as you can connected to the PCB so you can use the wires later.
Source: www.myglasseye.net
Now you have access to the PCB. You should unscrew the four screws and remove the circuit board from the iCade, but keep all of the wires that are attached to it first, including the LED. Also keep the four screws and posts that came with the PCB. You can cut the black and red cable that goes to the AA battery housing. Try to leave as much cable as you can, as you will need it later to connect to the two wire leads on the AA battery holder case.
Source: www.myglasseye.net
If you take a look at the circuit board itself, it has the stick positions noted on it. Each joystick connector on the PCB has a black ground wire as well. The black ground wires for the joystick need to be daisy chained to the single black (Sanwa) or orange (Seimitsu) wire on the new joystick. Depending on how you have your stick positioned and what brand it is, the rest of the wiring to the arcade stick can vary. Please refer to the following joystick wiring diagram from rtdzign.
You can see that the button wires are labeled on the PCB as well. It should say COM YHIUJLKO. COM is the ground wire. It needs to be daisy chained from one button to another. If you are not familiar with how to daisy chain a ground cable to joystick buttons, Anomaly Arcade Sticks has a good tutorial here: http://www.instructables.com/id/Arcade-Stick-Daisy-Chain-Wiring/
Looking at the iCade PCB you can see exactly where to find the joystick, buttons, and AA battery connectors. This is what the PCB looks like in detail, and where to find the right wires.
For reference, we've made a chart of the PCB, wire, signal, Bluetooth passcodes, and iMAME4all layout for the entire iCade PCB. This should come in handy as you wire the PCB into your GameThing controller. If you make any mistakes along the way or are unsure of what goes where, please refer to this chart.
You will need to mount the PCB and the AA battery holder into the lower part of the inside of the GameThing controller. You can see that I mounted the AA holder on the left, and the PCB on the right.
I used very small wood screws and glue to mount the AA battery holder to the lower left of the GameThing. For the PCB I drilled small holes with a hobby drill and mounted it to the GameThing using the original iCade PCB screws and posts. Then, I connected the AA battery holder to the AA battery wires. The wires go red to red, and black to black. Red is positive and black is ground. If you mix them up you may damage your PCB.
This is how the buttons should be hooked up. You can see the Bluetooth passcode numbers labeled on these. Because it is flipped over, they are in reverse. The two enter buttons should actually be on the right side. So, you should refer to the code chart above as well.
You can also refer to the ION iCade Quickstart Guide. The quickstart guide has the passcode numbers for each button and joystick direction at the top. It also tells you how to pair your iCade with an iPad using Bluetooth.
The iCade sends signals using an on-off method. It uses Bluetooth to send a different letter for when a button is pressed, and when it is released. So, for instance if you push the first button (passcode 5) it will send the signal "y" in lower case. Then it will send a lower case "t" when it is released.
Source: http://flatfootfox.com/
Because of the way it sends signals, it can make it difficult to remap keys depending on what program you are using. This is what it looks like if you are looking at the arcade stick. Remember these are all lower case letters that are being sent.
source: http://flatfootfox.com
I left the LED inside the arcade stick so it will show through the clear buttons, but you can use the LED however you'd like. It is nice to know when the iCade is on, because it has a power saving feature that will turn the iCade off fairly quickly.
Once it's all connected and turns on, you can pair it to your iPad. Please take a look at the Quickstart PDF above for more information on that, or the top piece of your iCade frame if you kept it. You should be good to go to use the GameThing as an iCade controller. I highly recommend running MAME and outputting the iPad to your television. It also works with other emulators like NES, and Super NES.
If your iPad is jailbroken you can find these and other iCade compatible games on Cydia:
- iMame4all
- MAME4iOS
- NES.emu
- Snes9x EX+
If your iPad is not jailbroken you can still use any of these games from the App Store:
http://www.ionaudio.com/products/icade-games
Additional Notes
Television Output: The iCade works from as far as across the room. That means if you have an HDMI AV Adapter Cable, you can use it for playing games like MAME on your television. I recommend using one that has a USB connector as well so you can charge your iPad at the same time. Otherwise you will run out of power on your iPad fairly quickly.
Additional Resources
Owen Billcliffe's How to Customise an iCade Stick and Buttons
http://myglasseye.net/news/customise-mod-icade-stick-buttons/
How To Build A USB SNES Controller For The PC, iPad, And PS3 - Part 2: Theory
iCade Bluetooth Keyboard Mappings for MAME
http://gaming.stackexchange.com/questions/24774/icade-bluetooth-keyboard-mappings-for-mame