DIY Arcade Controller

Overview
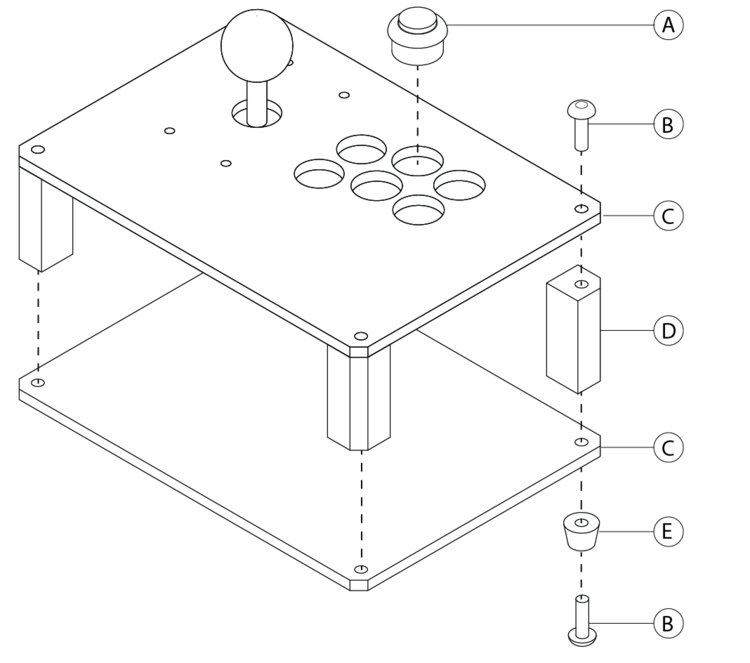
Quick to replicate and easy to customize. The main structure is composed of four extremely rigid resin-plastic corner pieces. They're optimized to be 3D printed then reinforced into something resembling a rock. You can make all the parts yourself, or have us ship pre-made parts directly to you.
Make what you want. Ship the rest.
Index of Materials
- A ) Buttons, joystick, and electronics
- B ) Fasteners
- C ) Frame
- D ) Corners
- E ) Rubber Feet
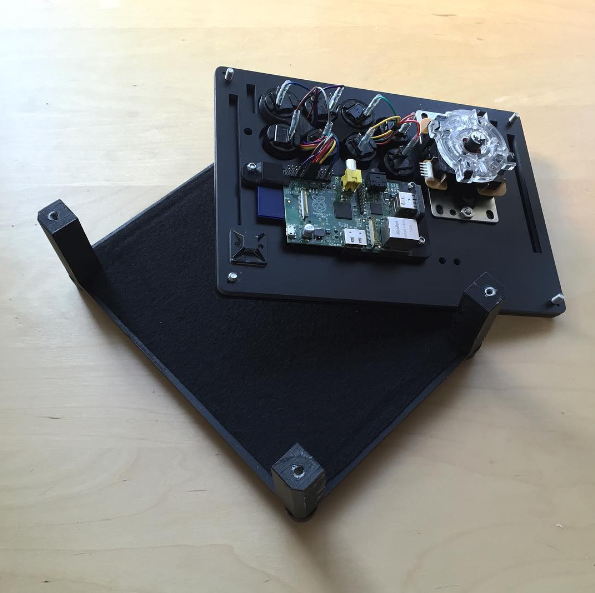
Buttons, joystick, and electronics
The default frame fits 8 arcade buttons plus joystick and electronics:
- Sanwa JLF joystick mount holes
- 24mm buttons holes, screw or snap-in
- Space for Raspberry Pi mounts or anything about the same size


Cutouts for larger components, such as 30mm buttons or Happ/IL joysticks, can be requested here or ordered on a larger format project box here. In addition to the controls, there's enough room in the wrist area to mount a Raspberry Pi and/or USB encoder.
More info coming soon, but skim the guides:
- on how to wire up the Raspberry Pi for wiring suggestions.
- emulating a keyboard as a game controller with an arduino


Fasteners
- Stainless steel #10-32, at least 3/4-inch long, 7/8-inch is ideal. Max length is defined by your corner height.
- Each frame requires 8 + 4 more for the joystick.
- The style in the photo is a button-head socket cap screw. Driver is 1/8-inch hex (3mm hex, H3, kinda works too). I highly recommend a powered screwdriver with a bit to save time and sore fingers.
- Any fastener you have on hand can work, either chose one that works with the corners or modfiy the corners to match your screws.


Frame
9.75 x 7-inch [248 x 178mm] with a 1/4-inch [6mm] chamfer at the corners. The frame is designed for 1/4-inch [6mm] thick material but anything you have on hand can be used. Provided it's sturdy enough for button mashing. The optional clear acrylic top should be no more than 1/8-inch [3mm] thick to fit the shorter buttons. As a bonus the top piece adds some overall rigidity. Everything is fastened down at the corners (on the top and bottom) using 8 screws.
DIY:
Free 1:1 scale SVG and PDF files


Made by us:
6-10 days to your door ( USA )

Don't see what you need? Request for more to be added
Corners
To make the corners download and 3D print the files. Fasten a bolt and nut to both sides, making sure it's a good seal around the base. In the photos, the rubber feat are used to provide a good seal. Now is a good time to use water and check for any leaks. After emptying the water and drying the parts, fill the 3D printed corner with resin. Leave some space at the top. Place the lid on top submerging the screw+nut. Allow to cure. Make sure not to cover the overflow port.
These corner pieces accomplish several things at once. The 3D printed shell provides an easy method to adjust the height of the controller. It doubles as a mold for the resin thereby removing the need to make a mold. Finally, the cured resin can encase nuts for an inexpensive threaded insert and all in one design.


Rubber Feet
Many possibilities exist, these are the ones I've been using: generic furniture rubber feet
